Microsoft 365 SMTP relay can connect on-premises devices and applications to Exchange Online through an inbound connector. This guide focuses on an IP-based connector and a supported sending device or SMTP server. If you are replacing an existing IIS SMTP installation, start with the inventory and migration notes in our legacy IIS SMTP guide.
On this page
- Choose the sending method
- Prepare the environment
- Create the inbound connector
- Configure the sender
- Check SPF and email authentication
- Test delivery and access restrictions
- Troubleshoot and maintain
- Microsoft sources
1. Choose the sending method
| Situation | Option to assess |
|---|---|
| A device or application supports OAuth | SMTP AUTH with OAuth. Review tenant and mailbox settings; avoid enabling it broadly. |
| Automated messages stay within your tenant | High Volume Email uses dedicated application/device accounts and does not deliver externally. |
| Application email to customers | Azure Communication Services Email provides SMTP sending and delivery telemetry; assess its setup, limits and charges. |
| On-premises sender needs connector-based relay | Follow the IP-based setup below. Certificate authentication is preferable where the sender supports it. |
2. Prepare the environment
Have an accepted sender domain, a static public egress IP exclusive to your organization, outbound TCP 25, and a sender capable of TLS 1.2 or later. No licensed mailbox is needed for connector relay. Microsoft’s device and application guidance excludes relay from third-party hosted services such as Azure.
- Record each device’s owner, address, sender identity, recipients and current mail route before changing anything.
- Ask the firewall administrator which public IP will be used for this exact SMTP traffic. A private LAN address is not the egress address.
- Obtain Exchange connector-management permissions and DNS access. Agree on a pilot device and a rollback window.
- Inspect existing connectors first, especially in hybrid environments; avoid duplicating or overwriting a working route.
3. Create the inbound connector
In the Exchange admin center open Mail flow → Connectors. These steps configure mail travelling from your organization to Microsoft 365, not the reverse direction.
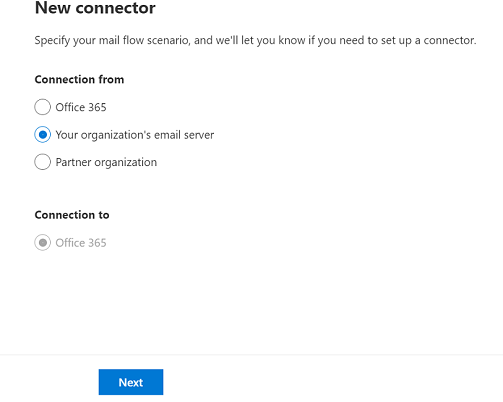
- Select Add a connector. Set the source to your organization’s email server and the destination to Office 365.
- Give the connector a descriptive name, such as
Office devices — Vancouver egress, and enable it. Leave retention of internal Exchange headers off for this device-relay scenario. - Choose identification by sending-server IP address. Enter the verified public egress IP, review the configuration and create the connector.
- If using certificate authentication instead, follow Microsoft’s certificate-specific procedure and verify the certificate identity matches an accepted domain.
See Microsoft’s inbound connector walkthrough. Record the connector’s name, owner and approved source addresses in your change record.
4. Configure the sending device or supported relay
| Setting | Value |
|---|---|
| Smart host | Your tenant MX endpoint, such as contoso-com.mail.protection.outlook.com |
| Port | TCP 25 |
| Encryption | STARTTLS; TLS 1.2 or later |
| Microsoft 365 username/password | None for this IP-based connector |
| Sender | Address in your accepted domain |
Find the tenant endpoint under Microsoft 365 admin center → Settings → Domains → select domain → DNS records → MX. Use the Microsoft-provided endpoint even if your public inbound mail uses a different gateway. Do not change public MX routing just to configure outbound relay.
Use the supported SMTP product’s own instructions for listener configuration, queues, logging and certificate handling. Test TLS before switching production senders; do not silently fall back to an unencrypted route.
5. Check SPF and email authentication
Update the domain’s existing SPF record to authorize the real sending sources. Keep one SPF record, preserve legitimate existing senders, and stay within the DNS-lookup limit. For an IP-based relay, include the public egress IP. The following documentation-only example must be adapted before use:
v=spf1 ip4:203.0.113.10 include:spf.protection.outlook.com -all203.0.113.10 is a reserved example address. SPF validates the envelope sender’s domain; it does not replace DKIM or DMARC. Review all three and inspect received-message authentication results. Microsoft’s SPF guidance explains the record requirements.
6. Test delivery and access restrictions
- Send from the actual pilot device to one internal and one external mailbox you control. Use a unique subject and record the send time.
- Confirm receipt, inspect Junk folders and message headers, and compare the result with Exchange message trace and the sender’s SMTP logs.
- For a local relay, attempt the same submission from an unapproved test host on a network you administer. It should be rejected at the listener, firewall or relay-permission boundary.
- Check every production egress path, including failover. Ensure the connector identifies only the intended sources.
- Observe the pilot before moving remaining devices. Keep the previous configuration available until delivery and access checks pass.
A successful TCP connection proves reachability only. It does not prove STARTTLS negotiation, connector matching, authorized relay or final delivery. A test injected directly into a server’s queue also bypasses the device-facing access controls.
7. Troubleshoot and maintain
| Symptom | First checks |
|---|---|
| Connection timeout | DNS resolution, outbound port 25, firewall policy and ISP restrictions. |
| Internal delivery works; external delivery fails | Confirm the intended relay connector is enabled and matches the actual egress IP. Check whether the sender is effectively using Direct Send. |
| TLS negotiation fails | Sender firmware/software, enabled TLS versions and certificate validation. |
| Message rejected or quarantined | Capture the full SMTP response or NDR; check sender domain, SPF, message trace and security filtering. |
| Queue grows or failures appear after failover | Compare timestamps with network changes and the public IP used by the sending server. |
Use Microsoft’s printer and application troubleshooting guide to investigate the exact response. Do not solve delivery failures by opening relay permissions to everyone. Assign an owner for queue monitoring, firmware updates and egress-IP changes; for certificate-based deployments, include certificate renewal monitoring.
For migration assistance, contact Guava Systems with your device types, sender domains and intended recipients.
Microsoft sources
- Device and application sending methods
- Connectors between your email servers and Microsoft 365
- SPF configuration
- Printer, scanner and application troubleshooting
- SMTP AUTH controls
- SMTP AUTH Basic Authentication timeline
- High Volume Email
- Azure Communication Services Email
Related SMTP guidance
- Compare Microsoft 365 email-sending methods for device, application, Direct Send and SMTP AUTH decisions.
- Review legacy IIS SMTP relay migration options if an existing Windows SMTP service is involved.